In my van the hot water feed comes in through the wall of the bathroom (see post), through a tap and into the shower head. The water feed to the shower comes straight from the output of the instant water heater. No mixer is needed because the heater has it’s own temperature control.
All you need to do to have a shower is to turn the lever tap–the pump comes on automatically (triggered by the drop in pressure) and the water heater fires up instantly (triggered by water flow).
I used domestic plumbing fittings and standard shower hose connections simply because these fitting are widely available and cheap.
1. Constructing the tap assembly
The job of this tap assembly is to take water into the bathroom, feed it through a tap and to provide a thread for the shower hose to screw on to. The tap is mounted using the rigid structure of the copper pipe that is fixed to the wall using two brackets. This is quite a rough and ready kind of installation, but its simple and effective. I like this look.
The picture below shows the components I used for the tap fixture. All these fittings are for the standard 15mm pipe size often seen in homes (in the UK at least).
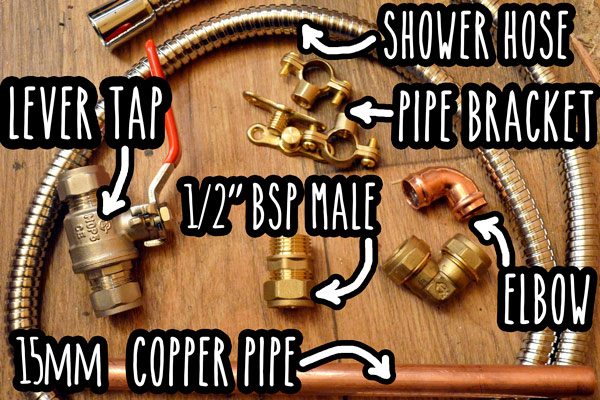
I’ll now quickly explain each component that makes up the tap assembly:
- Lever tap. I chose this, rather than a normal tap with a threaded valve that you turn, because the water heater requires a full flow of water to be automatically switched on. A lever tap doesn’t offer much variation of the flow, and is pretty much either on or off, so the boiler will always fire up when the lever is turned. It is also convenient to be able to turn the water on an off quickly with the flick of a lever, because the method of washing with limited water is very stop/start to save water–quick blasts to wash soap off. A fair bit of water can be wasted when you have to turn a rotating tap fully on and then fully off, multiple times during a wash.
- Elbow. There are two types of elbow shown in Image 6‑34. They both do the same job, except one is joined using heat (solder joint) and the other is joined using a spanner (compression joint). For the elbow inside the bathroom I used the type that is soldered just because I had one lying around. This solder elbow was the type that had the solder already inside, and all you have to do to make the joint is insert the pipe and heat it up with a blue flame until you see the solder seeping out around the edges.
- 1/2” BSP Male. Use to connect the copper pipe to the shower hose. This is the standard fitting for a shower hose (in the UK).
- Shower hose. This is a standard shower hose. One end connects to a showerhead (bought separately) and the other end has the 1/2” BSP thread (female) that screws on to the 1/2” male thread mentioned above.
- Pipe Bracket. Used for fixing the copper pipe and tap assembly to the wall of the bathroom.
- 15mm Copper pipe. This is standard copper pipe that is often seen in home plumbing installations. Plastic pipe could just as easily be used here–as long as all your other fittings are designed for plastic pipe. The only reason I used copper pipe is because I prefer how it looks.
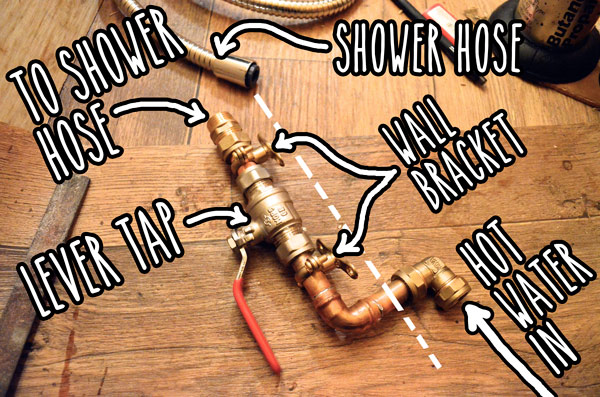
I put these components together to make the tap assembly. The dashed white line (image below) is to show where it will be fixed to the wall of the bathroom.
One thing to be careful of when cutting and fitting copper pipe is that the cuts are straight (at a right angle) and clean. Also the pipe should not be crushed or deformed. You can get a special pipe cutter to make nice cuts, or you can just be really carful with a hacksaw. I used the hacksaw with out any problems.
2. Mount tap to wall
I drilled a 16mm hole for elbow of the tap assembly to go through the bathroom wall. I fixed it to the wall using the pipe brackets. I placed a length of wood behind the thin ply wallboard to give the bracket screws something more to go into, and also to give strength to the wall. Image below shows the mounted tap with the shower hose screwed on. Later on I applied silicone around the gap where the copper pipe comes through the wall.

3. Mount shower head to wall
I bought the shower head and bracket together. The shower head is one of these economical ones that is meant to use less water. There’s another type of water saving shower head that has a built in a pulsing mechanism that rapidly turns the water on and off. This sounds good, but it would interfere with the functioning of my water heater. I fixed the bracket to the wall the same way as I fixed the tap–using a supporting length of wood behind the wall for the self-tapping screws to go in to.

4. Connect to hot water supply
I connected the 15mm copper pipe to the 1/2″ semi-rigid hose (used for the rest of the water system) using a barb connector and a jubilee clip. The other side of this barb is a 1/2” female thread that fits over a 1/2” male compression fitting on the copper pipe. See below

See post on the water heater