Having a fridge in my van-home is essential, just like it is in a house-home. But it’s one of those things we don’t fully appreciate it until it breaks. And sometimes… they break.
It’s why I reckon, with appliances like this, it’s usually worth getting something that is good quality. Waeco are known to make some of the best portable 12V fridges around – they’re tough and can withstand conditions that ordinary fridges can’t.
But mine broke (a Waeco CDF-18 – bought 2nd hand a few years ago) and I was told it was unrepairable by 4 different Waeco dealers. A new one would have cost £400. So I fixed it myself. In this post I’ll show you exactly how I did it.
I noticed other people have had very similar problems with their Waeco fridges. So I hope this post helps these people. The fix I’m about to show you costs under £1 and about 1 hour of time.
This post isn’t for everyone. If you don’t have a broken fridge, this post probably isn’t so interesting for you. But if you’re into fixing things yourself or…erm…fridges, maybe it is.
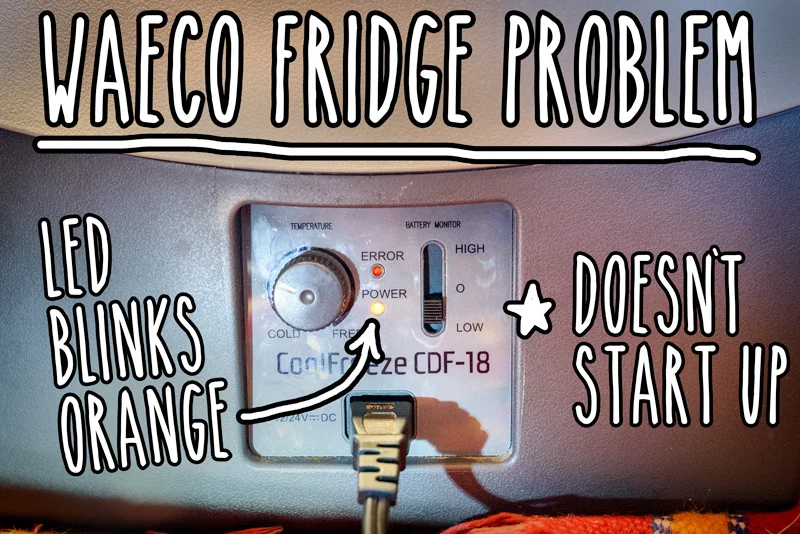
The problem
The power LED flashes orange (about every second) and the fridge doesn’t start up. This scenario wasn’t in the troubleshooting section of the manual – which lists the different flashing sequences that give an indication of different errors from the built-in diagnostics.
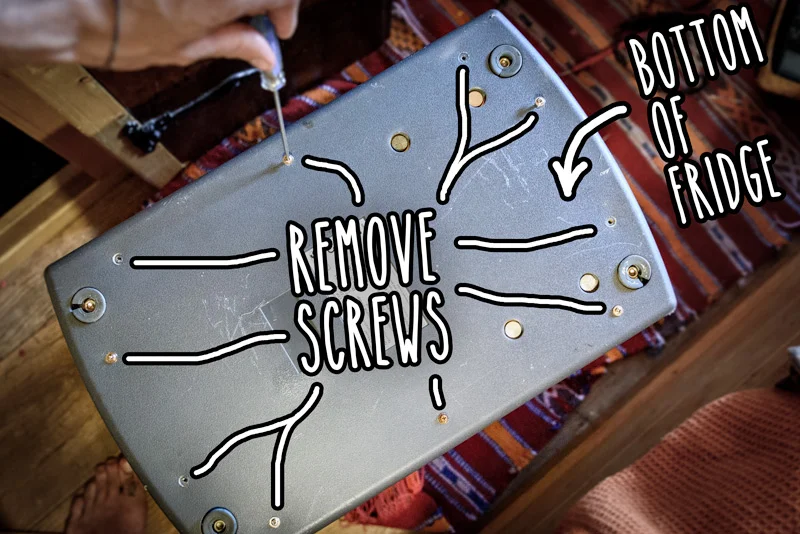
So I took it apart
All the screws are on the bottom so I turned the fridge upside down and took them all out.
I removed the casing
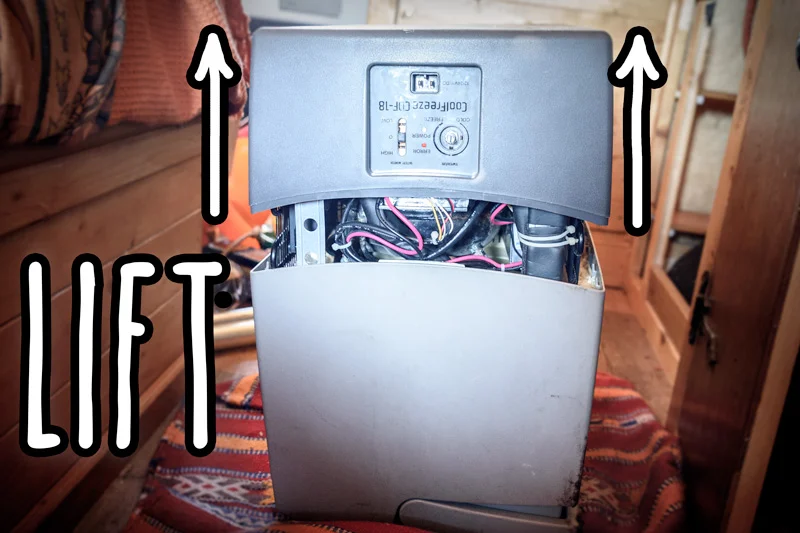
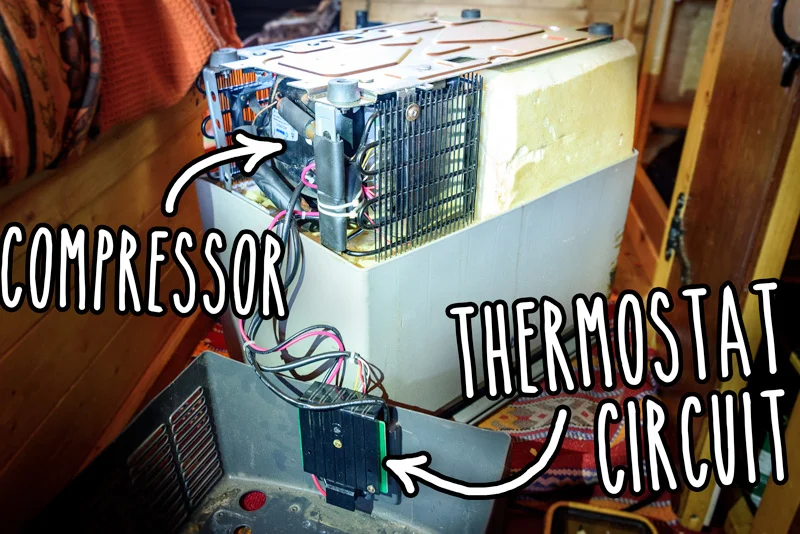
There are pretty much 2 sections to this fridge (and most fridges, in general) – the thermostat and the compressor
I’ll quickly explain what these things do. The thermostat circuit tells the compressor when to turn on and off depending on the temperature inside the fridge compartment – and the temperature set on the dial. The thermostat takes a temperature reading using a thermistor (a electronic component whose resistance changes with temperature). The compressor compresses the refrigerant/coolant and moves it around the food compartment causing it to cool.
So the first part of the fault finding process I had to determine which part of the fridge was at fault, the compressor part or the thermostat part.
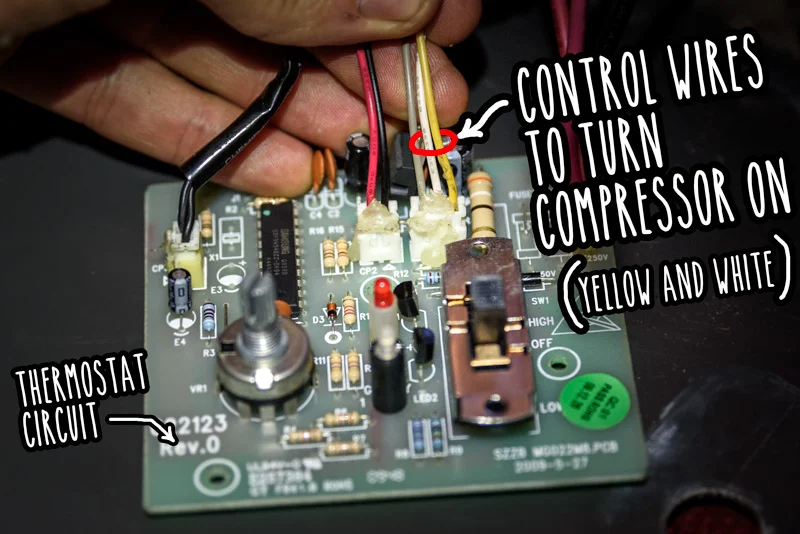
I located the wires that control the compressor (turn it on/off)
The thermostat circuit makes and breaks this circuit to turn the compressor on and off. So if you short these wires yourself (technical terms for ‘touch them together’) you would be manually overriding the thermostat circuit, telling the fridge compressor to turn on. That’s how I tested the compressor.
I tested the compressor
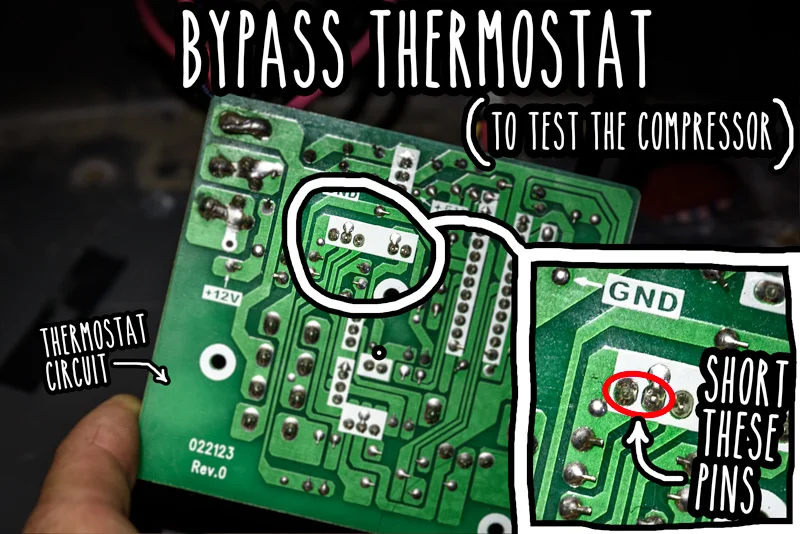
If the compressor is working then it should fire up immediately when these wires are shorted – the yellow and white ones in the above photo. I located the solder pads on the back of the circuit board and put a small screwdriver across the solder joints to ‘make’ the circuit – see pic below. The compressor fired up. Now I could be sure that the problem was with the thermostat circuit.
I visually inspected the circuit board
Now I know the problem is to do with the thermostat, which is pretty much all fairly simple electronics. So this is the first and most obvious thing to do – visually inspect the circuit. I was looking for any burnt out components, lose wires or obvious broken things. All looked good. I tested a few diodes and transistors with the multimeter then moved on. But I knew there was another auxiliary component to this circuit that I couldn’t see: the thermistor.
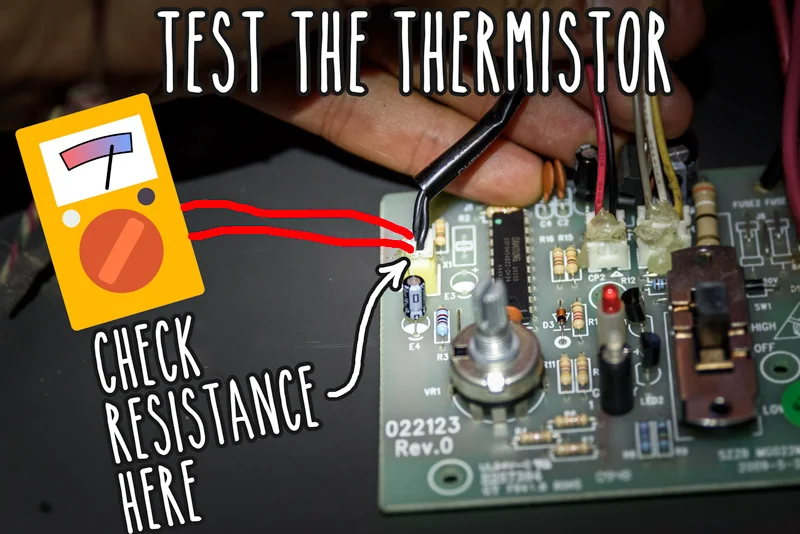
So I tested the resistance of the thermistor with a multimeter (this is where I found the problem)
The actual thermistor is on a length of wire and is buried under the whole compressor assembly and potted in a load of glue. So I tested it at the point where it connects to the circuit board (via a white push-block connector). I could easily test this component (by checking its resistance) but first I had to first figure out what reading to expect – i.e. what resistance range this particular thermistor operates in. After a bit of research I found that it is very likely to be a 10KOhm NTC (negative temperature coefficient), which just means that when the temperature goes down the resistance goes up, within the range of 0 to 10KOhm. And that’s something that can be tested easily with a multimeter.
It failed this test. I was getting a reading of 200Ohms regardless of temperature. So there’s the problem: The thermistor.
But I wanted to be sure it was the thermistor at fault
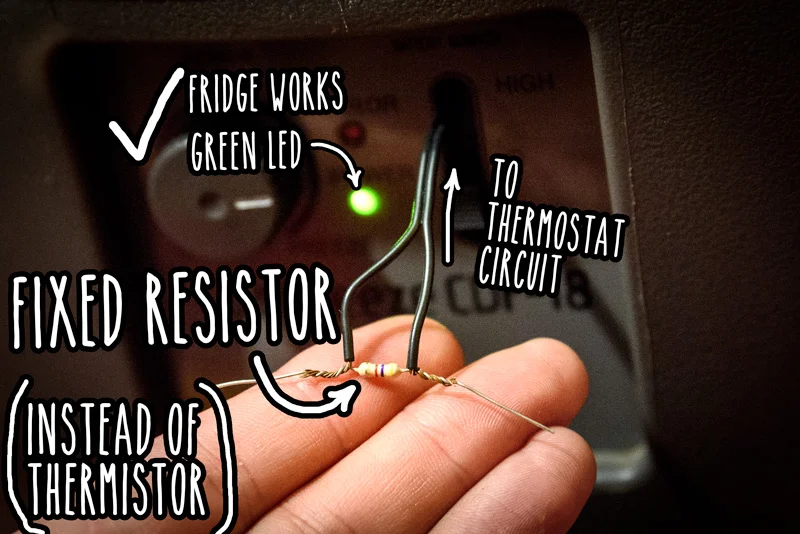
So I bypassed the thermistor with a fixed resistor (4.7kOhm – middle of the thermistor range) to confirm my suspicion. The fridge compressor fired up immediately. Now I was certain that the problem with the fridge is because of a faulty thermistor. Now I could look for a fix.
I bought a replacement thermistor
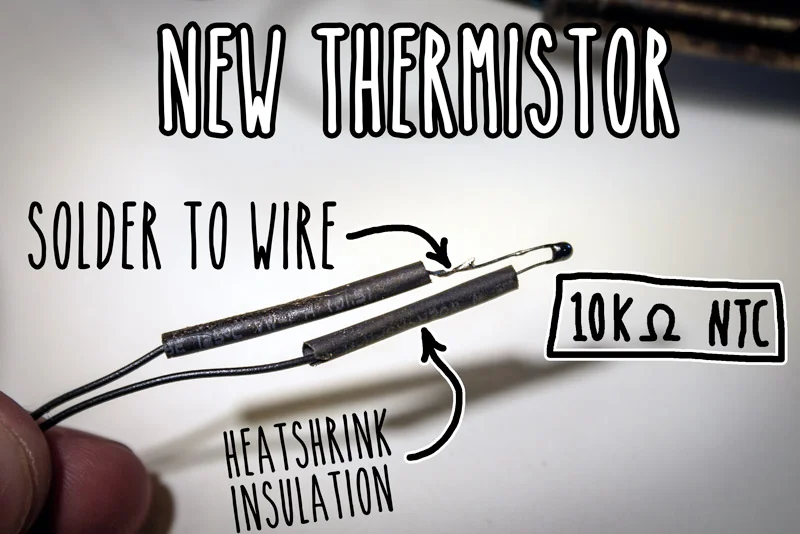
I bought a 10K NTC thermistor. It’s a very common and cheap component. I bought a pack of 5 on Ebay for like £0.99.
Whilst waiting for the thermistor to arrive I operated the fridge manually
This meant that I had to turn the fridge on and off throughout the day using the switch on the side. If I left it on, my food would freeze. If I left it off my food would go bad. But it was better than nothing, until I fixed it. Note: the picture below is showing the fixed resistor as a temporary solution until the thermistor arrived.
A small problem: the thermistor is difficult to replace
I mentioned earlier, the thermistor is in a tricky location. The whole compressor assembly has to be removed, as well as a load of glue. It seemed difficult to replace without risk of bending the copper pipes or breaking the solder joints.
So I mounted the new thermistor in a new location
I know, this is a bit of a quick fix, and it’s not the neatest solution. I know. But it works and there’s no risk of damaging the compressor and the soldered copper pipes, causing more problems.
I soldered the new thermistor on to a length of thin wire
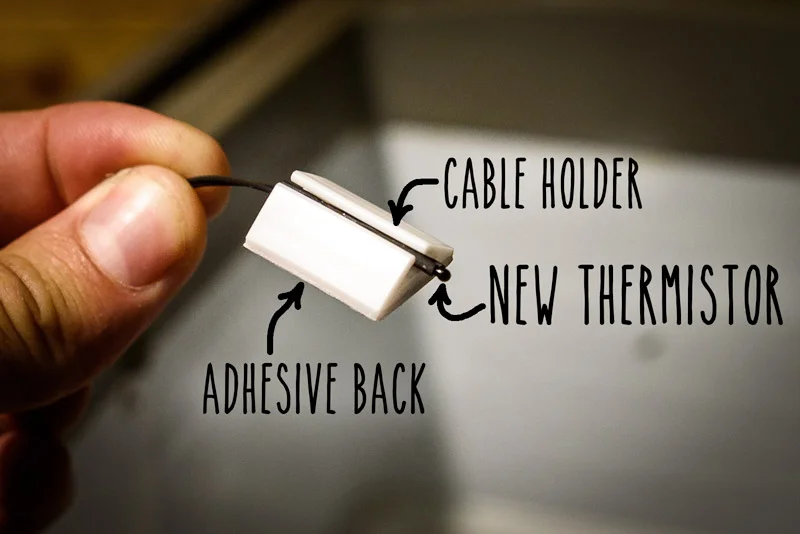
I put it inside a cable holder so it could be easily mounted (without getting damaged)
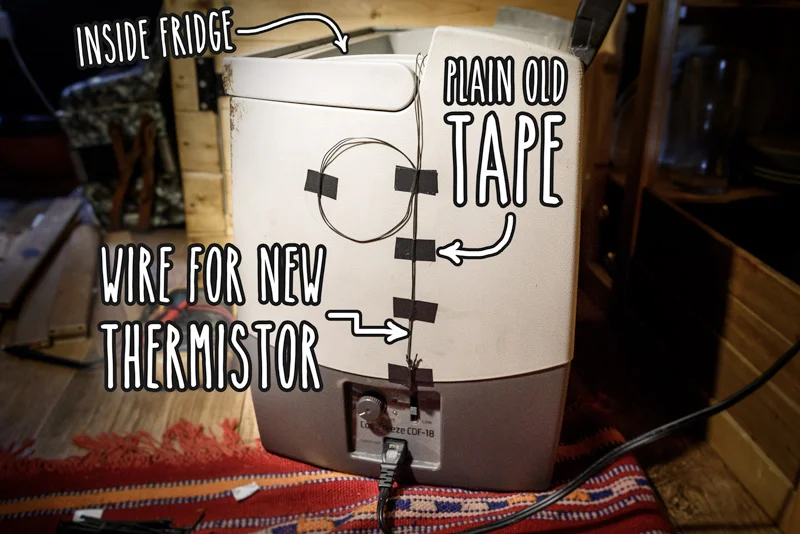
I mounted it inside the fridge compartment
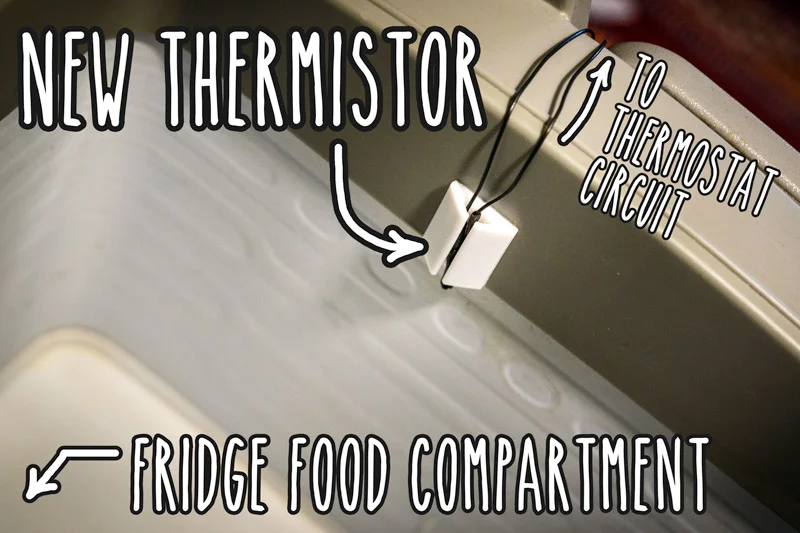
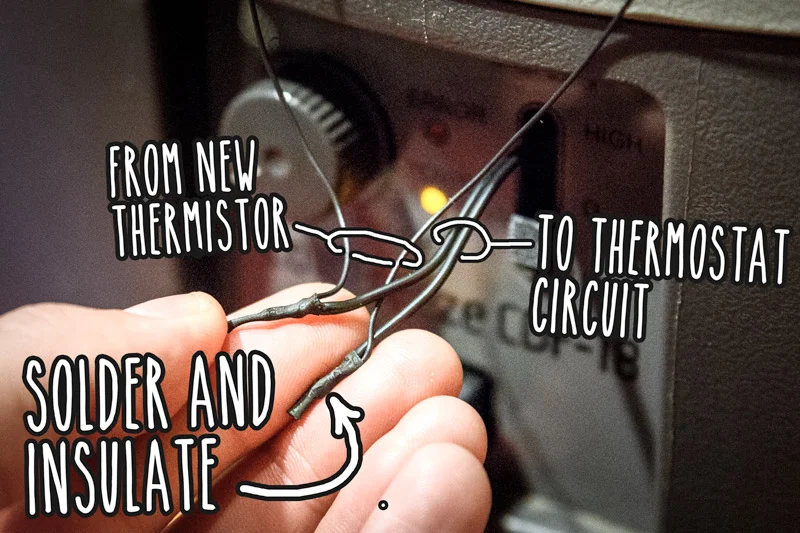
And connected it to where the old thermistor was
I just cut off the old thermistor and abandoned it. I soldered the new thermistor wires and insulated with heat-shrink
I neatened it up a little bit
I stuck the new thermistor wire to the side of the fridge so it wouldn’t get caught and pulled and broken. I left a bit of slack incase I needed to experiment with the position.
The fridge now works!
And it works just like it did before it broke.
Conclusion
It’s annoying when the people in the shop tell you something can’t be fixed, especially when it can. Usually what they mean is that they either can’t be bothered or it’s just not profitable for them. Fair enough I suppose. I went to 4 different Waeco dealers and service centres and non of them could help me. Two of them said this particular model of fridge is impossible to fix.
The lesson? don’t always listen to people just because they work in a shop. After visiting the 4th Waeco dealer I nearly bought a new fridge for £400. Instead I fixed this fridge using a part that costs less than £1, plus a few hours of my time. I’ve also learnt a bit about fridges in the process.
So if you have a similar problem with your fridge (it doesn’t even have to be Waeco) then I hope this post helps a bit.
And remember to use the comments to add any useful things or ask questions 🙂