• Skip to primary navigation
  • Skip to main content
  • Skip to primary sidebar
  • Skip to footer
  • Home
  • About
  • Contact

Vandog Traveller

Quit job, build campervan, travel

  • Van conversion
  • Van Life
  • Books (NEW!)
    • Live in a Van
    • Make a Van (Updated)
  • My Location
  • Photos
  • Forum

Fixing water leaks on the LDV convoy

September 9, 2013 by Mike 6 Comments

  • Share
  • Twitter
  • Pinterest
  • SUBSCRIBE
No spam. Ever. Unsubscribe easily any time

I thought I’d post this for all the soaking wet LDV owners. I’ve seen a few people on various forums with a ‘mystery water ingress’ problem in their LDV Convoy. Leaks can be really difficult to get to the source of and just when you think you’ve sorted it you wait for the rain to come and your feet are wet again–very frustrating.

leak-in-cab

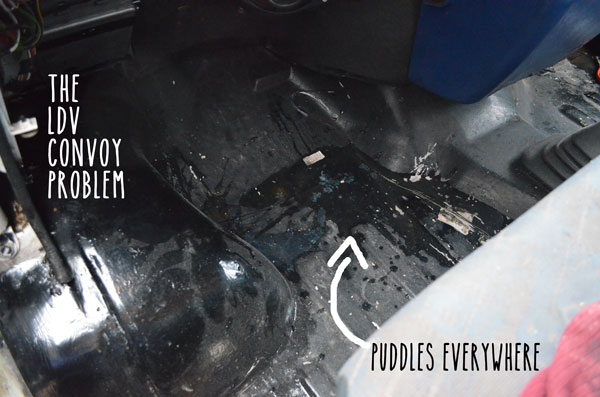
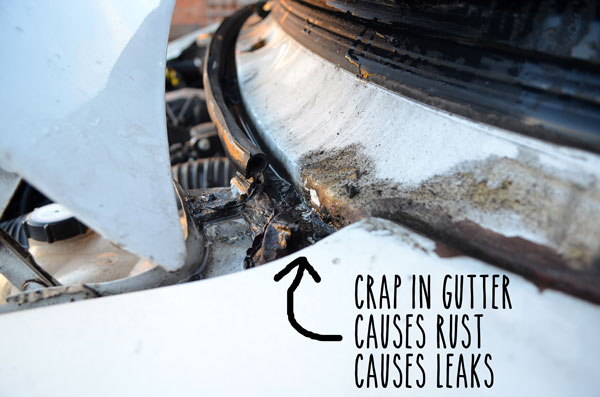
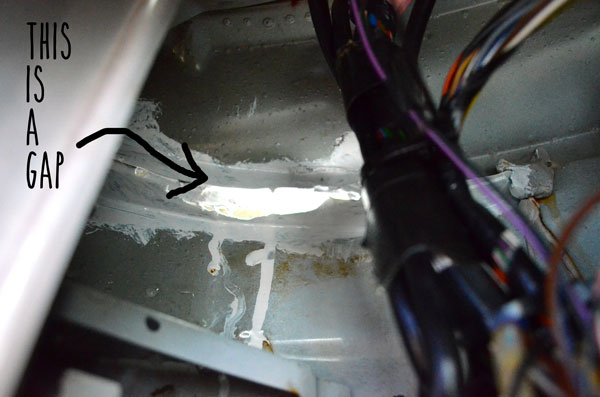
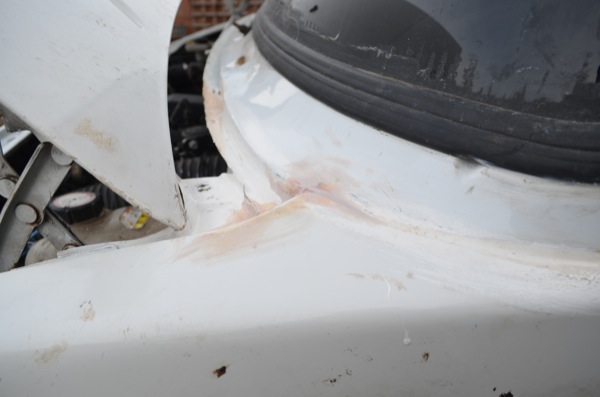
The picture above shows a puddle of water next to the central console right under where the water pipe comes in for the heating matrix–one assumption would be that the pipe has a leak and thats exactly what I (wrongly) thought. I reckon the only way to get the bottom (top) of a leak is to get the garden hose out. The water was actually coming in at the top corner  of the wing, above the wheel arch. I never would have guessed.

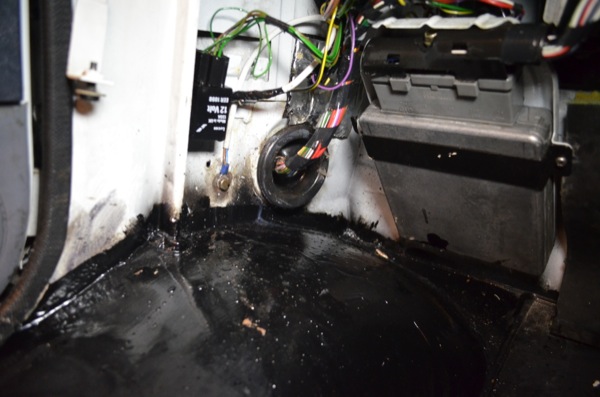
I found this problem was exactly the same on nearly all the LDV Convoys I have seen in the breakers yard and guess what? they all had soaking wet floors. Now I know why no one puts carpets in these things.

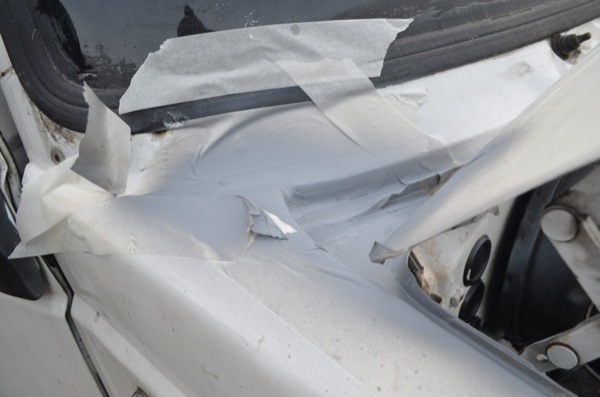
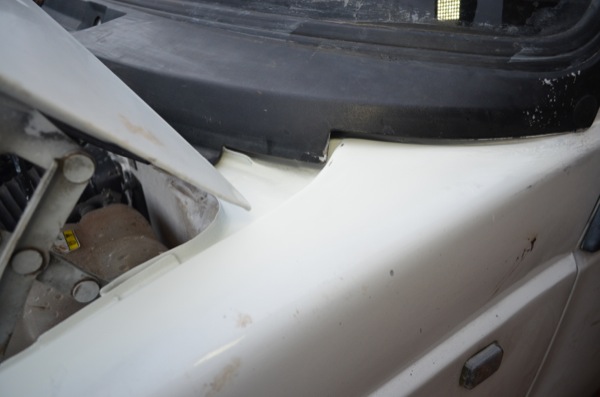
Here’s how to fix the LDV Convoy water leak problem

Materials used:

QuantityItemCostSupplier
1Autotek filler primer spray paint 500ml£4Amazon
1HYCOTE Ford white paint 400ml£7.49Amazon
1Davids fibreglass resin£10.08Amazon
water-leak-electrics
Not cool! water drips right onto the relays and main ECU loom
ldv-convoy-gutter-leak
guttering was blocked up with gunk and leaves which probably helped the rust along
gaps-in-body-panels
All the water from the roof and windscreen runs down through this gap in the inside top of the footwell. A good inch of water will collect very quickly. This has to be sorted before I put soundproof and carpet down
leak-in-van
This is the main cause of water ingress in all LDV Convoys. The seams at both corners of the guttering below the windscreen start to rust and rot. I cleaned up both corners with wire brush drill attachment
fiber-glass-in-gutter-seams
Rather than do a quick fix I filled the corners with fibreglass after rust converting. I put patches underneath and on top.
primer
a few layers of high build primer straight onto the sanded fibreglass.
transit-white-paint
I used white paint (‘transit white’) . The colour match is pretty much exact I think
ldv-convoy-ecu-waterproof
For a precautionary measure (and also for fun) I put the ECU in a sandwich bag in an attempt to protect it against any water ingress

EDIT: Two (English Winter) months later and everything is bone dry. If you are a leaky Convoy owner then I hope this is useful for you. It is like a whole different van now it doesn’t leak 🙂

  • Share
  • Twitter
  • Pinterest
  • SUBSCRIBE
No spam. Ever. Unsubscribe easily any time

Filed Under: Converting my van Tagged With: uk, van conversion

Books to help you…

Make a van into your home…Live the life (new!)…
From Van to Home bookLive in a Van and Travel book
Get From Van to Home hereGet How to Live and Travel in a Van here

Reader Interactions

Comments

  1. Jono Chadwick says

    March 16, 2014 at 9:35 pm

    Mike, thanks for this. My Convoy Camper has never been dry since when we bought it last year. Just had a proper look at the guttering and it was like as you said. I’m no mechanic so my fibreglass patchwork looks like a dogs dinner but it’s better than nothing. Just done it today so will see how I get on but I reckon it’s a winner!
    Out of interest, do you know what that creamy white stuff is that they seal the panel seams with? What should you replace it with? When I come across rust on mine (which is a lot of the time) this stuff always seems to be perished.
    Keep up the good work….and finding problems so I have it easy 😉

    Reply
    • michael says

      May 12, 2014 at 10:50 am

      Since no one has answered thought i might – the white sealer stuff is normally called sikaflex (is other makes) it’s a bit like a silicone sealer / adhesive grab – but it doesn’t go hard , it stays flexible so wont crack etc (if in uk can get from screwfix or the likes

      Reply
  2. MoelRob says

    March 8, 2015 at 4:08 pm

    Just bought our LDV hitop conversion. Ah! The wet floor. Peeled back the flooring, and not at all bad beneath. Water coming in between plastic scuttle and base of windscreen. Silicone gun! Poured for around 12 hours, and then the Sun emerged. Floor? Dry as a bone. Not so just under parcel shelf, butting up to window. Emptied bucket, still raining, and duct taped around guttering and top window frame. Rain stopped. Bucket empty, and fabric drying out. German stuff called ThixFix going over creeping crack above guttering in place of the tape (you can paint over it). Otherwise, I think we have found and remedied all the leaks. Thanks Welsh mountain weather!

    Reply
  3. Dan says

    August 13, 2015 at 8:17 pm

    Just discovered water in the footwell of my recently bought ldv, thought it might have been windscreen rubber. So I have been trawling web looking for someone to supply and fit one. Then came across your page can’t wait to check if the problem is like the one you mention, as it looks like a much easier and cheaper fix. Once I’ve had a look I will let you know the result, thanks for now, keep up the good work and may your travels be bodacious……

    Reply
    • neilofgnosall says

      September 3, 2015 at 11:38 pm

      Could be windscreen rubber. Try mastic. Changing rubber is a nightmare. New windscreen rubber is always too stiff. Took well known company two visites and three new windscreens. The smallest stonechip in the old windscreen and it’s gameover when you try and string into new rubber. New windscreen is two man job. Loads of wd40 needed. It’s very physical then crack. Prestretch new rubber for a few days on the old screen helps. Tears tears will my van ever work again. It’s fixed now, but I’m never going there again.

      Reply
  4. Chris Rynn says

    April 28, 2016 at 1:01 am

    Nice!
    Just had to get a new ecu myself due to water damage.
    Love the sandwich bag idea! How do I get at the ecu? Passenger side footwell? Had trouble finding good images online for locating the thing…

    Reply

Leave a Reply Cancel reply

Your email address will not be published. Required fields are marked *

Primary Sidebar

Popular Ones

  • Travelling Europe in a van – My track and location 187 comments
  • Learn how to make a van into your home 87 comments
  • Living in a van – surviving winter 73 comments
  • My DIY camper – from rusty van to cosy home in 5 months 61 comments
  • 16 ways to save money whilst living and travelling in a van 59 comments
  • About Vandog Traveller 51 comments
  • Cheap GPS tracker – my review and installation 48 comments
  • All the details of the van conversion 48 comments
van conversion ebook

Footer

Old van to cosy home in 3 months

DIY campervan conversion

Recent comments

Try the search…

  • Home
  • BOOKS from Vandog
  • About Vandog Traveller
  • Archives
  • Contact
  • RSS Feed
  • Subscribe

© 2021 · Mike Hudson · Privacy Policy · Permissions