• Skip to primary navigation
  • Skip to main content
  • Skip to primary sidebar
  • Skip to footer
  • Home
  • About
  • Contact

Vandog Traveller

Quit job, build campervan, travel

  • Van conversion
  • Van Life
  • Books (NEW!)
    • Live in a Van
    • Make a Van (Updated)
  • My Location
  • Photos
  • Forum

Heating my van (the proper way). Here’s how I installed a Propex heater

October 13, 2016 by Mike 38 Comments

  • Share
  • Twitter
  • Pinterest
  • SUBSCRIBE
No spam. Ever. Unsubscribe easily any time

Last winter I didn’t need heating because I was in Morocco. But the winter before that was cold. I used to wake up in the night and have to turn the gas hobs on to warm up.

But that’s all about to change. This post goes over how I fitted a Propex heater in my van. Finally my van has proper heating. I’m excited.

Edit (24th Oct): NOTE – Although I’m just showing how I did this in my van, some people don’t like that I’m potentially encouraging others to install their own gas appliances. If you are not comfortable working with gas then it’s best to get someone else to do it. Please don’t blindly copy me, because I’m not a gas engineer.

campervan-heating-flame

campervan-propex-heating-installation-hot-air

Choosing a heater

I wanted something with a thermostat that would turn itself on and off automatically in the night. There are 2 main types of heater for this purpose: the Eberspacher (runs on diesel) and the Propex (runs on lpg/propane).

I chose a Propex because I already have a good amount of gas storage and I didn’t want to have to tap into the van’s fuel tank. The diesel heaters, although very efficient, can be noisier and have more things to go wrong. I chose a specific model that they no longer make: the Propex Compact 1600 because of its small size. It cost £250 secondhand off Gumtree.

Fitting goes a bit like this:

  1. decide location
  2. fit air inlet and exhaust to outside of van (through floor)
  3. route and fit gas supply
  4. wire up thermostat and power
  5. Secure, neaten and fix things down and test
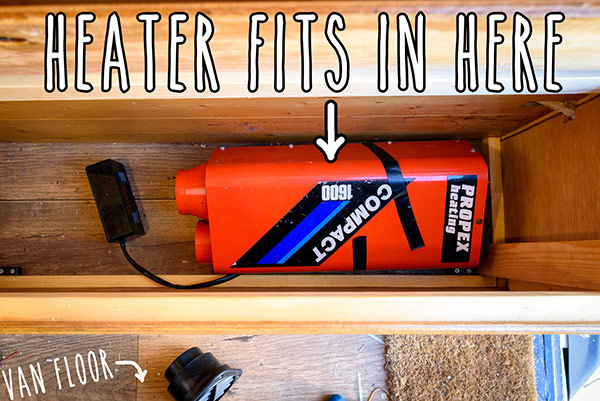
Decide on location

I’d just built a box seat at the back of my van and the heater fits perfectly in there.

campervan-propex-heating-installation-compact1600

Mark holes for inlet and exhaust

The heater uses a closed flue system meaning it takes the combustion air in from outside the living space being heated – marked as ‘air in’ in the photo below. The combustion gasses are directed out of the living space via the ‘exhaust out’. So there will be no water vapour produced inside the van (byproduct of burning propane) and it won’t use up all my oxygen.

campervan-propex-heating-installation-fitting

campervan-propex-heating-installation-pilot-holes

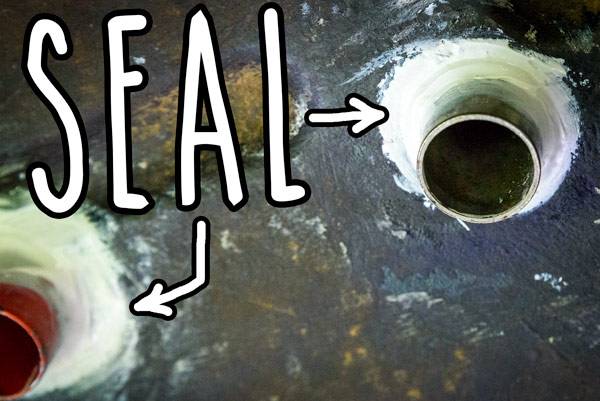
Check underneath and open holes to 32mm

I checked under the van’s floor that there was enough space (around the pilot holes) to make room for the exhaust and air inlet pipes from the heater.

campervan-propex-heating-installation-32mm-holes

I filed and painted the bare metal to stop it rusting

campervan-propex-heating-installation-paint-holes

And sealed with PU adhesive

I used a ‘caravan sealer’ but any flexible adhesive/sealant is fine, preferably Polyurethane based

campervan-propex-heating-installation-sealant

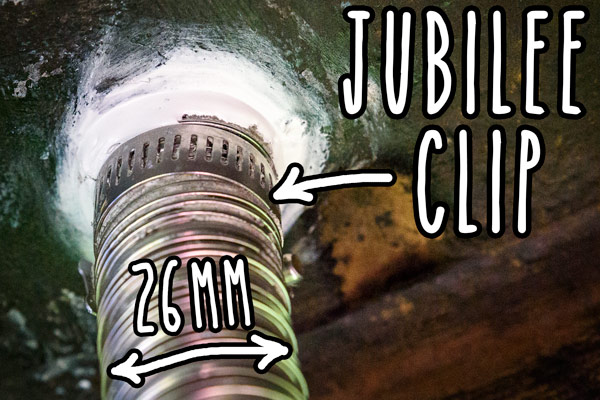
Secure stainless steel pipe with jubilee clip

I secured the stainless steel pipe to the air and exhaust ports of the heater with jubilee clips.

campervan-propex-heating-installation-flue-pipe

Fit the gas supply

The heater is on the other side of my van to the gas supply. I have to run a gas pipe underneath the van and back up through the floor to where the heater is

campervan-propex-heating-installation-gas-pipe

I used standard 8mm copper pipe

campervan-propex-heating-installation-8mm-copper-pipe

How to secure gas pipe under the van?

I had to make do with the bits I had. I used these plastic modesty blocks (usually used for furniture making and shelving) and butterly clips to fix the pipe to the underside of the van’s chassis.

campervan-propex-heating-installation-gas-pipe-hanger

I used the existing holes in the chassis for the fixing points

campervan-propex-heating-installation-gas-pipe-fix-under-van-floor

It took 4 metres of pipe

campervan-propex-heating-installation-13

This is the van floor under the heater

The air in and exhaust face away from each other. The exhaust should point out away from the van.

campervan-propex-heating-installation-van-floor

I used a pipe clip to secure the end of the exhaust

campervan-propex-heating-installation-heater-exhaust

I connected the heater to a spare output on my gas manifold

This is why having a gas manifold can be really useful. Each output has an isolation tap – water heater, cooker and air heater.

campervan-propex-heating-installation-gas-connection

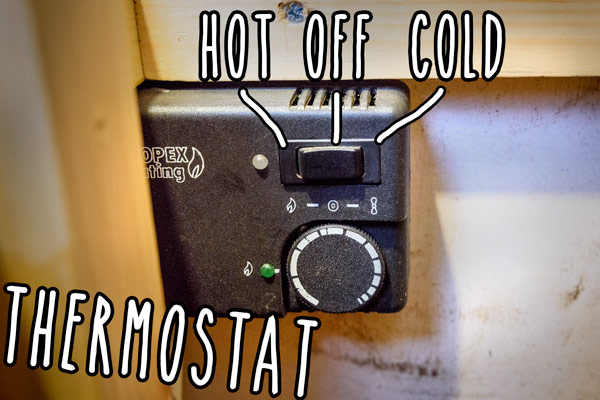
Wire up the thermostat

I couldn’t find any info on wiring this old thermostat but I worked it out looking underneath the PCB. It has four wires: 2 for 12V power (red and black) and 2 for control of hot air and cold air (orange and purple).

campervan-propex-heating-installation-thermostat-wiring-compact-1600

Fix thermostat to wall

I put the thermostat out the way under the bench leaving space around the vent for the air to get to the thermistor – the component that senses the temperature.

campervan-propex-heating-installation-thermostat

Fit hot air vent inside of van

I put the hot air vent as low as possible. Hot air rises etc.

campervan-propex-heating-installation-vent-hole

The vent swivels in the middle to direct the heat

I have a spare one of these if anyone wants it? They cost like £10

campervan-propex-heating-installation-air-vent

The heater is inside here

I put the ‘air in’ hole facing the back door mainly because it looks less intrusive. Also, In the summer I can put the heater on cold air mode and it will take air from outside (with back door open) and blow it into the van.

campervan-propex-heating-installation-5

Installation complete

I fed 63mm aluminium lined ducting (below) from the hot air output of the heater to the hot air vent on the front panel of the bench unit. The air inlet doesn’t need ducting.

campervan-propex-heating-installation-compact-1600

Testing: the heater doesn’t work

Gutted!

Sometimes it fires up the first time but most of the time it doesn’t light at all, even after +30 on/off cycles, and automatically shuts itself off. The heater is faulty

Edit: All working. See this post: How I fixed my propex (compact 1600) campervan heater – not igniting

But when it does work it’s amazing

When the heater does decide to turn on and properly ignite it’s amazing: Instant hot dry air and really quickly heats up the van. The location is great because when I’m sat at my desk I get warm legs and feet.

Conclusion

It’s always a gamble when you buy secondhand things, especially when they are over 20 years old. If I wasn’t comfortable with fixing things I would have really regretted buying this gumtree heater.

Apart from that, these heaters are straightforward to install. What’s also very good is the support from Propex. The people there still know all about this exact model and are happy to help even though it was made in 1993. That’s a good business.

For more van problems see the next post: Van leaking oil. Parts not available. Here’s how I spent the past 5 weeks trying to get it fixed

  • Share
  • Twitter
  • Pinterest
  • SUBSCRIBE
No spam. Ever. Unsubscribe easily any time

Filed Under: guides, Living and travelling in a van Tagged With: heating, propex, uk

Books to help you…

Make a van into your home…Live the life (new!)…
From Van to Home bookLive in a Van and Travel book
Get From Van to Home hereGet How to Live and Travel in a Van here

Reader Interactions

Comments

  1. Hazel Hogan says

    October 13, 2016 at 7:49 pm

    Thanks for this, I need to get a heater for my camper so I’ll be getting one like this.
    Your blogs are the most helpful thing for van life, cheers

    Reply
    • Mike @vandogtraveller.com says

      October 14, 2016 at 10:53 am

      Yeah they are neat things. I’ve now fixed mine and I’m really happy with it. I’m not sure that I’d recommend getting one as old as mine though unless you are OK with taking it apart. Although, there’s not much to these things and they will last a long long time with a few little tweaks and repairs every 5 or 10 years – 20 in my case.

      Now I’m doing the post to show how to fix these things. Apparently this is a common problem with this model so hopefully it’s helpful

      Reply
      • marc klita says

        September 1, 2018 at 8:08 pm

        Ive just rescued one from a 1990 renault traffic, hooked it up to 12v supply on my workbench all seems to opperate so far, in the correct sequence, although the motor was seized as had been laid up for 5-6 years i freed this off using wd40 and engine oil. On monday i will hook it up to propane supply, fingers crossed.

        Reply
  2. Kjell Ivar Hodne says

    October 14, 2016 at 12:37 am

    Hello from Norway, and thank you for your sharing and inspiration! I think in most of Europe, the Truma gasheaters are well known, and they are really delivering what they are made for… Have used them for about 15 years, in 3 campervans i have “buildt” from panelvans, and my latest one is a 2.2 kw heater i bougt from second hand, that have been installed in a Tabbert 320 caravan. They are really safe and quiet, and they´r running without any electric need at all.

    Reply
    • Mike @vandogtraveller.com says

      October 14, 2016 at 10:49 am

      Hello! Is this the fire type or sealed blown air? I know many motorhomes come with Truma but it seems like Propex dominate much of the diy market. I’d like to see the Truma one. I forgot about them

      Reply
      • Kjell Ivar Hodne says

        October 14, 2016 at 9:04 pm

        Hello! The nr of the Truma is SP 223, and it’s the fire type. I have some photos from the jobb when i installed it in my campervan. You can send me a email adress or Messenger and i can send them to you, if you want.
        It’s really a brilliant German masterpiese…

        Reply
        • Scott Norris says

          October 17, 2016 at 10:22 pm

          Hey Kjell – I’d be interested in seeing these photos if you’d be so kind as to send them over! Sounds wicked. Scottnorris152@gmail.com. Also nice work mr. vandog sir. Was just pondering heater problems for winter…

          Reply
  3. -- -- says

    October 14, 2016 at 11:42 am

    Excuse me about this question but … does this van/instalatios pass the official inspections that “every” vehicle has to pass? Please, understand me: I think that here (Spain) you make a gas instalation for your own in a van you should legalize it… and I am pretty shure that this one wouldn´t pass the exam. What are you doing in this case?

    Thank you for your posts!! We enjoy them very much.

    Reply
    • Mike @vandogtraveller.com says

      October 14, 2016 at 9:15 pm

      There is no requirement to do this in England apart from some vague clause like ‘work to be done by a competent person’ – no inspection or certificate needed for vans

      Reply
  4. Stephen Sierakowski says

    October 14, 2016 at 2:38 pm

    It should be an easy fix and not expensive, they’re pretty simple units compared to diesel. I have exactly the same one in my other van 1995 VW T4 and still works flawlessly. Better to have a heater with an exhaust than risk carbon monoxide/dioxide in the van.

    Reply
    • Mike @vandogtraveller.com says

      October 17, 2016 at 12:46 pm

      Yeah I like how simple it is inside and understanding it straight forward. I managed to find the fault and fix it. I was hoping I didn’t have to get a new spark generator – potted and unservicable black box costing £90 odd from propex for a replacement. All fixed now and didn’t cost any more money

      Reply
  5. Rick Hurst says

    October 16, 2016 at 4:12 pm

    I had the same propex heater in my van – it didn’t like the input voltage to be too low. I know you have decent batteries in there, but worth ruling out if you haven’t already 🙂

    Reply
    • Mike @vandogtraveller.com says

      October 17, 2016 at 12:41 pm

      Yeah a weak spark because of low power was also what I thought at first. It was a weak spark but it was due to a dry solder joint and possibly the spark gap being too big – it was huge. Fixed it now and I’m doing a posting showing what I did and how I found the fault

      Reply
  6. Ewan says

    October 17, 2016 at 8:27 am

    You may have a gas lockout if you’ve not used for a few days. My propex has a reset for gas lock out procedure. Starting from the off poisition do the following within 2.5 ,seconds. Turn temp to max. Turn to flame setting. Turn off. Turn back to flame setting. Should then start up. Good luck!

    Reply
    • Mike @vandogtraveller.com says

      October 17, 2016 at 12:43 pm

      Ah interesting, I’ve not heard of this reset trick but I have a feeling that’s only on the newer models. On mine the gas valve was opening no problem (could hear it) but the spark just failed to kick in. I’ve fixed it now… will show in next post. I’m so glad it’s working though. Starts every time no problem

      Reply
      • Ewan says

        October 17, 2016 at 1:13 pm

        Ah right. I think I have the model one newer than yours. Glad it’s working!

        Reply
        • Mike @vandogtraveller.com says

          October 17, 2016 at 1:19 pm

          I think there was a change in gas appliance regulations and propex had to do some mods to the design – one of them including an air flow sensor, but I could be wrong. I know mine is very simple though

          Reply
  7. Vanholio! says

    October 18, 2016 at 10:29 pm

    I wonder if Propex is available in North America? Most of the vandwellers use much simpler Little Buddy propane heaters, but they’re not as safe. I don’t think they have a thermostat, either, but I ain’t sure.

    Reply
    • Matt says

      November 10, 2016 at 9:04 pm

      Search for a Truma Trumatic /Carver heater lpg/gas stove on second hand market here in Europe.
      They are incredibly reliable, no moving parts, no electronics, no electricty required to run.
      But really safe to use with thermocuple and thermostat for modulating heat.
      Look it up 😉

      Reply
  8. Alex says

    October 19, 2016 at 11:10 am

    Nice feet 🙂

    Reply
    • Mike @vandogtraveller.com says

      October 19, 2016 at 11:21 am

      They are the feet of My friend, Matt, who is also building a van right now 🙂

      Reply
  9. Mena Vieira says

    October 23, 2016 at 10:31 pm

    Bless your good efforts! I am at the moment deciding if I should get a new Eberspacher or a second hand one… this post kind of makes me want to get a new one, as I don’t have as much ability to fix these kinds of things as you do! Thanks for sharing….

    Reply
    • Mike @vandogtraveller.com says

      October 24, 2016 at 7:10 am

      The Eberspachers are a bit more complicated inside and more difficult to fix on your own. Just make you fully test it before buying. The only reason I was so keep to get this second hand one is because its the most compact model that’s no longer sold. I could have saved a lot of time and messing about just getting a new one.

      Reply
      • Mena Vieira says

        October 24, 2016 at 9:02 pm

        Thanks Mike! I have a mechanic friend who will help me in buying and installing it… hopefully I can learn something from him too in the process! 😉

        Reply
      • Alan Swanson says

        January 9, 2017 at 5:26 pm

        My espar hyrdonic hasn’t broken yet (knock on wood), but during a few malfunctions it has given me useful error codes. I recently ran it with a blockage in the coolant line and the error code clued me into it. I’ve heard they suffer from carbon build-up eventually, but those parts are easy to come by and I’m sure you’d get a sensible error code.

        Reply
    • Alex Cross says

      October 26, 2016 at 10:10 pm

      I have just finished installing a Eberspacher D2 in my van and loving it. In about 5 minutes the van is toasty and warm. I went for the diesel option as I’m not carrying any LPG or large gas bottles. (Only enough room for Campingaz cylinder.) I chose a new one with a 36 month warranty plus I know the history of the heater!

      Reply
  10. Alex Cross says

    October 26, 2016 at 10:44 pm

    The butterfly screw is a genius idea. Saved me from having to drill extra holes. Thank you.

    Reply
  11. Susan woody says

    October 27, 2016 at 4:44 pm

    Hi mike looooooooove you blog,wating to see What you do next. Are you off anywhere this winter?

    Reply
  12. Lewis Newrick says

    November 14, 2016 at 3:52 pm

    Excuse me i am just wanting to know what make and model your van is? I cant seem to find the answer on your website anywhere.

    Reply
    • Mike @vandogtraveller.com says

      January 7, 2017 at 5:59 pm

      Hey it’s an LDV Convoy. Not sure where in the world you are but it’s an English van made in 2003 but it’s based on a really old design

      Reply
  13. Jake Smith says

    November 21, 2016 at 12:35 am

    Holey Dooley. This installation is SO unsafe. Exposed, unsheilded, thin wall copper lines under the vehicle? Clamps with no padding against fretting? No pressure testing?? Explosion/asphyxiation trap waiting to happen.

    This is why gas plumbers go through actual training before they can do installations like this. Your first hint should be that your heater didn’t even work. Seriously, get someone who knows what they’re doing to finish this.

    Reply
    • Jhon Siders says

      November 23, 2016 at 2:49 am

      I have a high dollar 5th wheel RV the gas lines are run just like that on it except the clamps on the frame are round metal with a rubber ring inside held by a nut/bolt The pressure is under 1 PSI in the line after the regulator a once in a while inspection is common sense on it In the spring when I get it out and mid season the same on this kids DYI van would show a problem before it became a danger .

      Reply
  14. thee_demps says

    December 16, 2016 at 9:13 pm

    Kind of related comment: I love the idea of a wood stove in a camper van but I am concerned about stealth in urban areas with all the smoke coming out the roof. I was toying with a plan to run a stove pipe first up as (smoke normally travels), then curve down and through the floor, out the back next to the muffler to make it look like exhaust was coming out rather than black smoke. Is this a ridiculous idea? haha – never installed a wood stove before… I’m wondering if the smoke would vent properly.. Anyway, nice Post!

    Reply
    • Alan Swanson says

      January 9, 2017 at 5:21 pm

      I don’t think that would work very well. In my experience it’s all about generating a draft in the stovepipe, which then causes air to be drawn into the stove, which give a good steady burn that can be controlled by regulating airflow into the stove. The downward run would probably kill your draft causing a poor burn and lead to a lot of smoke inside the van.

      Reply
  15. Jason Curtis says

    December 1, 2017 at 4:07 am

    Thanks for the writeup – I’m installing my propex this week!
    Can you provide more detail about the manifold and how you connected the 1/4″ copper pipe to it, and how that connects to your (presumably 20lb) propane tank? What are the exact fittings you use and their names? You show the copper pipe under the van and then a different tube magically going to the manifold – mysterious! I’m having trouble figuring out those last details of my setup so it’d be great to have some more info there.

    Reply
  16. Jamie Arriaga says

    February 9, 2019 at 7:16 am

    How about a link where you bought it from?

    Reply
    • Mike @vandogtraveller.com says

      May 31, 2019 at 10:38 am

      The heater? I got it used from Gumtree. It has spent the last couple of decades on a house boat

      Reply
  17. chris walden says

    June 20, 2020 at 1:52 am

    Good article.

    I have inherited the same model from a guy at work and fitting it into my own van, so your steps really helpfull.

    Just one question. How much battery does it draw? I’ve seen a figure of about a week on a 80ah leisure battery (assuming no other draw on battery). So, a 200w solar panel should be good enough to keep battery topped up for heater use year round? How have you found power draw on your battery?

    Reply

Leave a Reply Cancel reply

Your email address will not be published. Required fields are marked *

Primary Sidebar

Popular Ones

  • Travelling Europe in a van – My track and location 187 comments
  • Learn how to make a van into your home 88 comments
  • Living in a van – surviving winter 73 comments
  • My DIY camper – from rusty van to cosy home in 5 months 61 comments
  • 16 ways to save money whilst living and travelling in a van 59 comments
  • About Vandog Traveller 51 comments
  • Cheap GPS tracker – my review and installation 48 comments
  • All the details of the van conversion 48 comments
van conversion ebook

Footer

Old van to cosy home in 3 months

DIY campervan conversion

Recent comments

Try the search…

  • Home
  • BOOKS from Vandog
  • About Vandog Traveller
  • Archives
  • Contact
  • RSS Feed
  • Subscribe
  • Affiliates

© 2021 · Mike Hudson · Privacy Policy · Permissions