• Skip to primary navigation
  • Skip to main content
  • Skip to primary sidebar
  • Skip to footer
  • Home
  • About
  • Contact

Vandog Traveller

Quit job, build campervan, travel

  • Van conversion
  • Van Life
  • Books (NEW!)
    • Live in a Van
    • Make a Van (Updated)
  • My Location
  • Photos
  • Forum

Constructing the frame for the cladding walls

September 25, 2013 by Mike 4 Comments

  • Share
  • Twitter
  • Pinterest
  • SUBSCRIBE
No spam. Ever. Unsubscribe easily any time

Before building the frame I need to think about some of this stuff:

  • the overall look of the cladding–Ideally It needs to follow the bowed shape of the van body
  • van space–this could easily take off a few inches of space all around. Head space is critical and I’d rather not loose any at all.
  • needs to be enough of a gap for a decent amount of insulation
  • where to run cables
  • any fixing points I may need for shower, kitchen, bed, benches etc so the frame behind the cladding can be strengthened

I need to design the frame as simple and light weight as possible whilst taking the above into account.

Here’s how I made the frame for the cladding walls

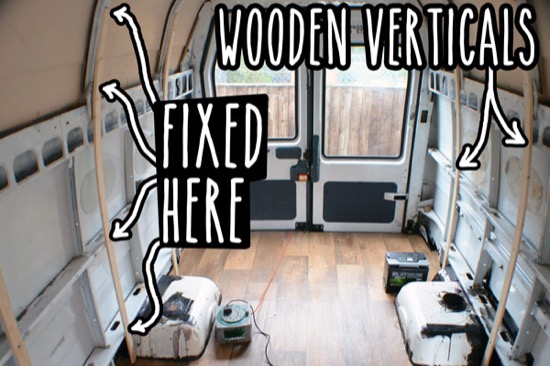
The cladding will be screwed to vertical wooden beams that I screwed into the existing metal struts of the van. I followed the curve of the van as much as possible to use all of the space–and it looks a lot better than a straight wall. There are a total of eight verticals (four on each wall) and four horizontal pieces on the ceiling.

1. The walls

For the vertical beams I used lengths of pine that were just thin enough to bend to the curve of the van wall, but still strong and deep enough for the cladding to screw into. I screwed these into the existing steel ribs of the van at the points marked with the arrows.

Vertical fixtures for cladding walls

2. The ceiling

I could not afford to loose any more height in the van so instead of fixing the wooden horizontal pieces on top of the vans metal ribs (like the vertical bits), I fixed two pieces either side. The horizontal pieces are completely flush with the existing metal struts that go across the roof, so no space is lost.

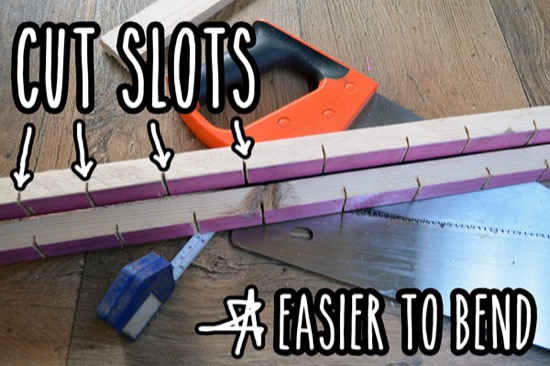
This wood I used for the roof beams was a bit deeper (to make it level with the metal strut) so I cut slots at even intervals to help them bend easier to the curve of the roof as shown in the picture.

Ignore the pink colour. I was recycling wood.

Horizontal fixture for cladding ceiling
Bending wood to curve of ceiling

3. Install wire conduit

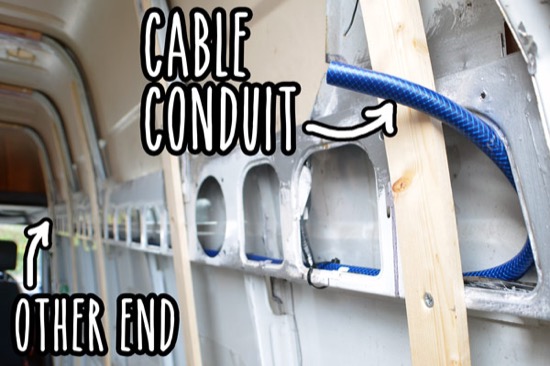
This is a good time to install any wires and cable that need to be hidden. At this point I didn’t know where the wires would be going so I installed some flexible hosepipe to use as cable conduit. This let me install wires behind the walls later, by just feeding them through the pipe after squirting a little WD40 inside to ease the wire through.

I ran two lengths of pipe across the ceiling (one at the front and one at the back) and one length down each side of the van wall from the front to the back. The picture shows the one that runs down the right side of the van wall.

Note: I only ended up using one of these conduits (to get the utility cable from one side of the van to the other). It worked well though, and is quite useful if you haven’t thought about the electrical stuff at this stage.

Hose pipe cable conduit

Now see post on fitting cladding

  • Share
  • Twitter
  • Pinterest
  • SUBSCRIBE
No spam. Ever. Unsubscribe easily any time

Filed Under: Converting my van Tagged With: uk, van conversion

Books to help you…

Make a van into your home…Live the life (new!)…
From Van to Home bookLive in a Van and Travel book
Get From Van to Home hereGet How to Live and Travel in a Van here

Reader Interactions

Comments

  1. Craig Snyders says

    February 22, 2016 at 11:02 pm

    Thanks for the hosepipe idea!

    Reply
  2. Victor Martino says

    April 4, 2016 at 1:44 am

    How about size information, like thickness & width of the framing? And how did you attach the roof framing to the metal framing??

    Reply
    • Hamsta says

      September 19, 2017 at 9:25 am

      If you look he screwed it in sideways to the struts that run width ways across the roof (obvs you can’t screw it through the roof as its a single layer of sheet metal!

      Not much point in putting thickness of framing as it really depends on the size of the van, how much you want to insulate it by, and how much space you are willing to lose. In my van the vertical battens averaged at 25mm which allowed me to squeeze 50mm sheeps wool insulation in between, but again it all depends.

      If you have a table saw it is much cheaper to purchase lengths of 2×4 or 1×3 and cut them to size because the thinner battens tend to be much more expensive.

      Reply
      • Hamsta says

        September 19, 2017 at 9:26 am

        width can be wider because there is no impact on living area and also you want a bit more leeway when fixing plywood or cladding, and when screwing fixtures and furniture in later down the line 🙂

        Reply

Leave a Reply Cancel reply

Your email address will not be published. Required fields are marked *

Primary Sidebar

Popular Ones

  • Travelling Europe in a van – My track and location 187 comments
  • Learn how to make a van into your home 87 comments
  • Living in a van – surviving winter 73 comments
  • My DIY camper – from rusty van to cosy home in 5 months 61 comments
  • 16 ways to save money whilst living and travelling in a van 59 comments
  • About Vandog Traveller 51 comments
  • Cheap GPS tracker – my review and installation 48 comments
  • All the details of the van conversion 48 comments
van conversion ebook

Footer

Old van to cosy home in 3 months

DIY campervan conversion

Recent comments

Try the search…

  • Home
  • BOOKS from Vandog
  • About Vandog Traveller
  • Archives
  • Contact
  • RSS Feed
  • Subscribe

© 2021 · Mike Hudson · Privacy Policy · Permissions