• Skip to primary navigation
  • Skip to main content
  • Skip to primary sidebar
  • Skip to footer
  • Home
  • About
  • Contact

Vandog Traveller

Quit job, build campervan, travel

  • Van conversion
  • Van Life
  • Books (NEW!)
    • Live in a Van
    • Make a Van (Updated)
  • My Location
  • Photos
  • Forum

Changing the engine coolant

December 3, 2015 by Mike 8 Comments

  • Share
  • Twitter
  • Pinterest
  • SUBSCRIBE
No spam. Ever. Unsubscribe easily any time

The engine coolant is easy to forget about yet it’s job is really important – it keeps the engine from overheating, stops internal corrosion and prevents freezing.

But why change the coolant? The chemicals in an engine coolant start to break down and stop doing their job after a while – about 2 years for normal coolant (usually coloured blue) and about 5 years for OAT (organic acid technology) type coolant – usually coloured red.

This posts goes over how I changed the coolant in my LDV Convoy van. It’s a simple job that anyone can do. It took me 25 minutes and much of that was waiting for the old coolant to drain out.

By the way, I’m not an expert (I only learnt about coolant types about 2 hours ago) and I’ve never changed engine coolant before but this should show you that it’s just a simple thing you can do yourself.

Edit: the coolant system in my engine is self-bleeding, otherwise I’d probably have to bleed the coolant system to make sure there’s no trapped air – can potentially cause damage. My engine is a Ford Duratorq 2.4L DI

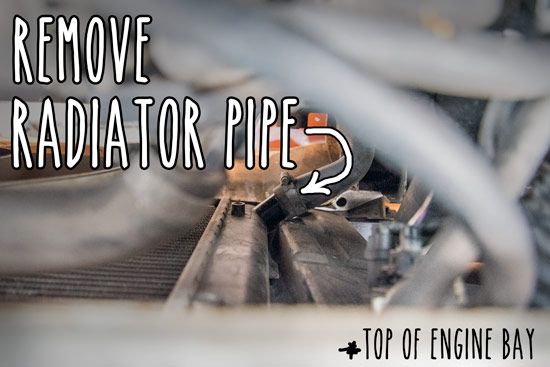
1. Drain the old coolant

Some engines have a dedicated drain plug for the coolant. You can either remove that or just remove a pipe to the radiator at the front of the engine – that’s what I did. I had a bucket underneath to catch it.
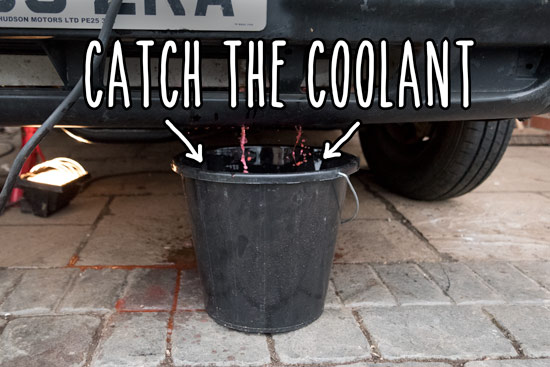
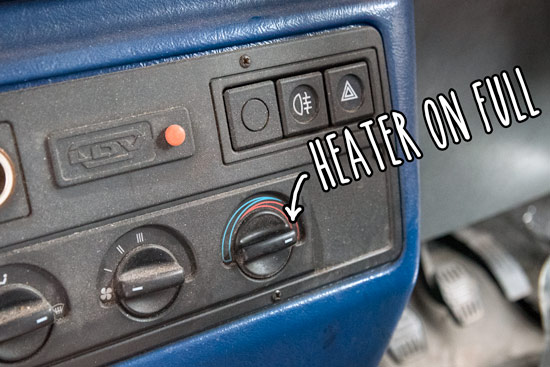
change-engine-coolant-radiator-pipe

change-engine-coolant-drain

2. Get it all out

I turned the cab heater on to full heat. This opens the valve to the heater matrix to drain all the coolant from in there as well. I took the cap off the coolant expansion tank to make it drain quicker and briefly started the engine to get all the coolant out of the water pump. The bulk came out quickly but to get all of it out I had to leave it for about 10 minutes.

change-engine-coolant-heater-on

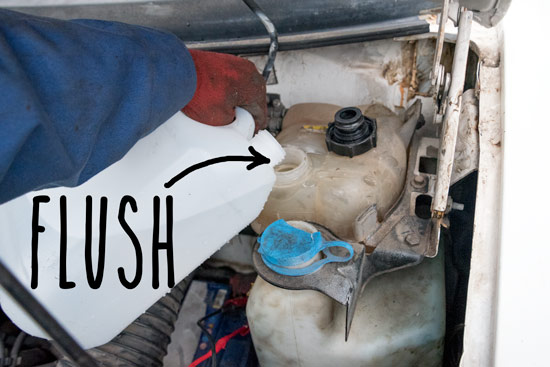
3. Flush through with water or coolant flush

I didn’t bother with engine flush. It’s another thing that engine manufactures do not recommend yet some people seem to swear by it. How you can tell the difference I have no idea (maybe someone can explain in the comments). I just poured in a few of litres of water and let it run though.

change-engine-coolant-flush

4. Put back the heater pipe or drain plug

After the coolant was all out I put the heater pipe back and secured it into the same position it was in before. I wiped this connection completely dry so I’d be able to spot any leaks that were because of my disconnecting/connecting.

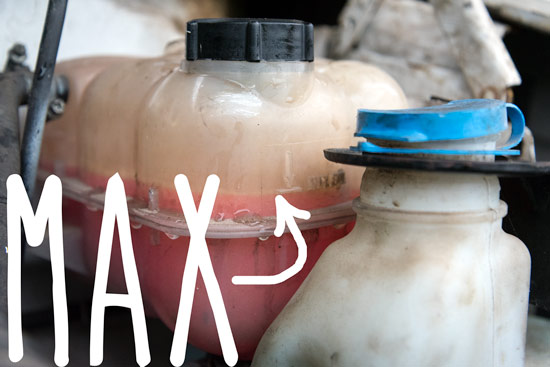
5. Fill with the required mixture of coolant and deionised water

I used a 50/50 mixture of OAT coolant and deionised water. A total volume of 9 litres. I filled to the max line on the expansion tank.

change-engine-coolant-mixture

6. Start engine to let it run round. Top up if needed

I started the engine to let the coolant run round. The level dipped a bit so I topped up.

change-engine-coolant-max-level

7. Keep an eye on the level over the next few days

When ever I mess around with something I like to keep and eye to see if I messed anything up or forgot to put something back properly. Coolant falling out the engine (and not knowing) could be disastrous. It’s good to check.

And that’s it. Feel free to add any tips or anything I’ve missed in the comments.

  • Share
  • Twitter
  • Pinterest
  • SUBSCRIBE
No spam. Ever. Unsubscribe easily any time

Filed Under: guides, Living and travelling in a van Tagged With: uk

Books to help you…

Make a van into your home…Live the life (new!)…
From Van to Home bookLive in a Van and Travel book
Get From Van to Home hereGet How to Live and Travel in a Van here

Reader Interactions

Comments

  1. Bernie Franklin says

    December 4, 2015 at 5:41 pm

    Hey Mike great job on the coolant change, but I would suggest just one more step. Whenever I change my coolant at the time I also change my thermostat. It may seem a trifle and they don’t go bad very often but I change it anyway. Call it cheap insurance and I don’t replace with a cheap but one I know won’t fail on my. Just my 2 cents.

    Reply
  2. Fellow Traveler says

    December 7, 2015 at 9:16 am

    Hi Mike, great site. Always an enjoyable read and great photo’s.

    Thought I’d better post because you haven’t explained the final part in enough detail. You must bleed the cooling system. Otherwise you can end up with trapped air and it will overheat. Possibly leading to a very expensive repair bill.

    You really need to find the specific bleeding quide for your engine. Some can be a real pain to bleed with a specific process and hidden bleed valve’s etc. But the basic way is as follows.

    Once you have filled the system, leave the expansion tank cap off. Turn the heater to fully hot. Start the engine. Run it up to temperature, keeping an eye on the temperature gauge. You should see air bubbles in the expansion tank. Your waiting for the thermostat to open. You should know when this happens because the water level should drop slightly and the heater will be blowing hot air. It is always advisable to check the inlet and outlet pipe’s of the thermostat. Find the thermostat which will have two or more pipes attached to it. One large pipe will get hot quickly (inlet). The other large one is the outlet and it will obviously get hot once the thermostat opens. You then refit the cap.

    It should take 15-20 minutes and I would agree with Bernie that it is advisable to change the thermostat.

    Regarding the flushing. It’s the same as engine oil flushing. It’s not advisable especially on older engine’s because it can breakaway large built up deposits with in the engine/cooling system. These large deposits can travel around the engine/cooling system and block the oil ways/radiator and cause very expensive repair bill’s.

    Reply
    • Mike @vandogtraveller.com says

      December 9, 2015 at 12:23 pm

      Ahh cheers for the info. I should have said that my coolant system is self bleeding and can be drained by just taking the radiator hose off, can’t it? (I made an edit at the top of the post). I don’t know if most engines are self bleeding like this. I would have thought so, but maybe not?

      Reply
  3. Kyle Scott says

    March 7, 2016 at 2:41 pm

    Hey Mike!

    Question: Taking the pipe off is super tricky for me, as the screw has seized up pretty bad. I also can’t find the bleed valve as the alternate way to flush. Any ideas where it might be?

    Thanks dude!

    Reply
    • Mike @vandogtraveller.com says

      March 28, 2016 at 3:19 pm

      You could cut the jubilee clip and replace it? or take another pipe off somewhere else in the circuit. Or you could maybe take off the return pipe to the expansion chamber and run the engine

      Reply
      • Kyle Scott says

        April 10, 2016 at 1:14 pm

        Got it in the end! Sweet dude, thanks!

        Reply
  4. Luis Garza says

    May 19, 2016 at 7:00 pm

    Make sure you put the bucket or catch pan below the car BEFORE you drain the petcock on the radiator or disconnect the lower radiator hose. You will be scrambling for it once coolant starts pouring all over the ground and running down your arm. Ask me how I know! From now on, I just have a local repair shop do it.

    Reply
  5. Darron Greatrex says

    December 5, 2017 at 5:40 pm

    theres the old saying if its not broken dont fix it

    Reply

Leave a Reply Cancel reply

Your email address will not be published. Required fields are marked *

Primary Sidebar

Popular Ones

  • Travelling Europe in a van – My track and location 187 comments
  • Learn how to make a van into your home 88 comments
  • Living in a van – surviving winter 73 comments
  • My DIY camper – from rusty van to cosy home in 5 months 61 comments
  • 16 ways to save money whilst living and travelling in a van 59 comments
  • About Vandog Traveller 51 comments
  • Cheap GPS tracker – my review and installation 48 comments
  • All the details of the van conversion 48 comments
van conversion ebook

Footer

Old van to cosy home in 3 months

DIY campervan conversion

Recent comments

Try the search…

  • Home
  • BOOKS from Vandog
  • About Vandog Traveller
  • Archives
  • Contact
  • RSS Feed
  • Subscribe
  • Affiliates

© 2021 · Mike Hudson · Privacy Policy · Permissions